
Octane Basics
Universal Material Channels Deep Dive
Version 3.0, Updated January 2023 using Octane 2023.1.2 and C4D 2024.2
Universal Material Channels Deep Dive
Version 3.0, Updated January 2023 using Octane 2023.1.2 and C4D 2024.2
About This Guide
This guide is a deep dive into the channels found in the Universal Material. If you need a primer on what the Universal Material is and how to think through building a material using it, check out this guide
What Changed from 2.0
This guide has been rewritten to account for new changes to Octane (mostly new BSDF/BRDF info, and the Abbe number for Dispersion), and more importantly new understanding of how it all works. Most of the information from 2.0 was still valid, but several things have been clarified and a little more attention was given to PBR texture maps and color spaces. All of the images were re-rendered as well.
PDF
This guide is also available in PDF format here.
Downloads
A full writeup, download, and preview images of lots of Universal materials can be found here.
Introduction
The Universal Material was introduced in 2018, and remains one of the most versatile ways to make nearly any type of material.
All Octane materials are broken down into channels, and the Universal Material has quite a few of them. In this guide we’re going to further divide the channels into a few buckets: Basic, Advanced, Surface Depth, Special Effects, and Coating.
Basic channels are the ones that determine the type of material - whether it’s a metal or a glass or a clay or something else. Advanced channels affect the properties of the basic channels to refine the material - how shiny or rough is the plastic? What happens to light when it passes through a glass? Are we after a gold, bronze, or aluminum? Surface depth either affects the geometry (displacement) or fakes it (bump/normal). Special effects include things like thin film and opacity, and coatings go on top of the whole material to give it a shine or satin finish.

Basic Property Channels
The Albedo, Specular, Metallic, Emission, and Transmission channels control the material’s basic properties.
Albedo alone without any other contribution from the other basic channels makes a perfectly matte material. This typically isn’t found in nature, but it’s great for non-photoreal scenes.
Specular and Metallic add reflective properties to a material. Metallic overrides Specular, so in most cases, we’d want to decide which of these two channels we want to control the reflection and only use one of them. While they can be mixed, it just complicates things and turns into more sliders to move around when tweaking the material.
Emission turns the material into a light source. For the most part, we’ll want to turn the contribution of every other channel down to zero and focus on the light.
Transmission allows light to pass through the material (transmit). Albedo, Specular, Metallic, and Emission all murk this up a bunch, so it’s best to set them all to zero contribution and only add a little bit of the others if necessary.
Albedo Channel

The Albedo channel controls the overall base color of the material. It’s similar to the Diffuse or Color channels in other apps and even other places in Octane. It’s mostly used for non-metallic, opaque materials like plastic, stone, wood, and the like, but it also sets the base color for metals when the IOR type is set to Artistic or Color+IOR.
When we’re making a Transmissive (glass or SSS), Emissive (light-emitting), or Metallic material with the RGB IOR type, the Albedo channel should be set to pure black so it doesn’t interfere with the look of the material. This is done by setting all color sliders to 0 (H/S/V or R/G/B), and setting the Float slider to zero.
Picking Colors
This channel can be controlled by float slider (0 = black, 1 = white), a color picker, or by a Texture input.
Usually when we’re picking a color for the Albedo channel, we’re going to want to ignore the float slider. This gives us a 0-1 black-to-white linear scale which - because of the way our eyes see - is difficult to use. Octane’s default RGB sliders are also linear, so that’s also kind of challenging.
Ideally we want to use a nonlinear color picker because the gradients will look more evenly distributed and the values for percentages will better line up with what we’re expecting (see the illustration above). When Octane’s color picker is set to HSV, it chooses nonlinear values. All of C4D’s native color picker modes are also nonlinear, so both of those are good options.
Somewhat related, if we’re using a texture input in the Albedo Channel, we’re nearly always going to want to set the Color Space dropdown in the ImageTexture node to sRGB. If we know for sure that it’s Linear sRGB (gamma=1) or ACES or something else, we can set it to that instead, but the default of Linear sRGB + Legacy Gamma and the gamma set to 2.2 is almost NEVER the right setting.
PBR Texture Sets
When using a texture set from Substance or Quixel or the like, the texture map most likely to hook into the Albedo channel is either BaseColor, Diffuse, Color, or Albedo. Most of the time, the color space dropdown in the ImageTexture Node for this channel should be set to sRGB (not Linear sRGB+Legacy Gamma) unless we know for sure it’s using a different color space (in which case we want to choose that one).
Specular Channel
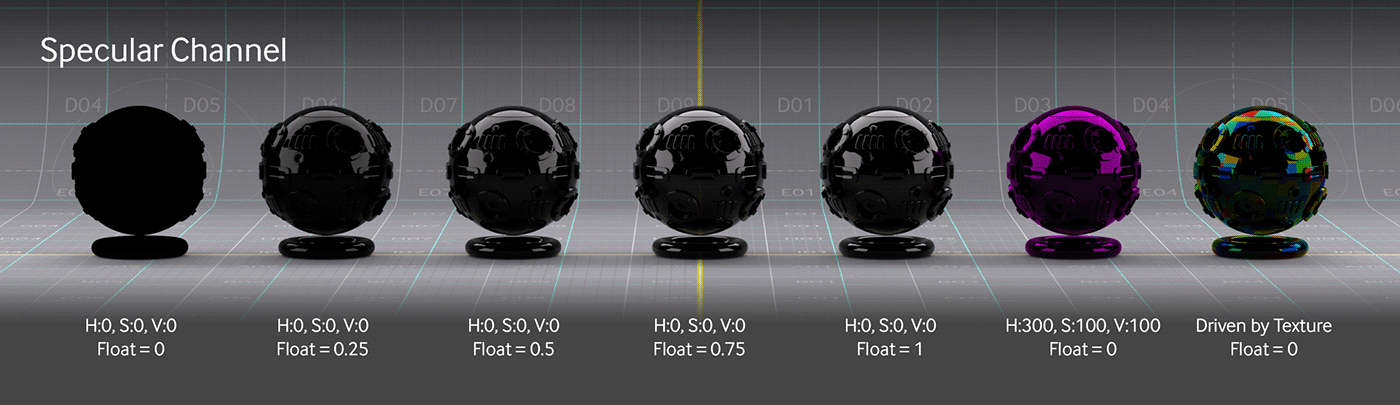
The Specular channel determines how reflective a non-metallic material is. Specular affects both the intensity and color of the reflections. The lighter the value (closer to white), the more intense the reflections will be.
Specular works hand in hand with the IOR channel (dielectric setting) to really dial in the reflection properties. Most real world materials don’t have an IOR of more than 2 or 3, so if we’re looking for a super reflective, yet realistic material, we should consider using the Metallic channel instead.
The Metallic channel overrides the Specular channel, so most of the time we’re going to want to choose to control our reflections via the Specular channel (glass, shiny plastic, etc.) or Metallic (metals), and then only use ONE of those two rather than try to mix them.
When we’re making a matte material like clay or concrete, Specular should be set to 0/0/0, and the float value should be set to zero.
Picking Colors
Like Albedo, most of the time we’re going to want to pick a particular Specular value using a nonlinear color picker because it’s easier to visualize the outcome and the scale appears better distributed to our eyes. If we use an HSV picker, we can adjust the V (value) slider from 0-100% to control the intensity of the reflection, and then the Hue and Sat sliders to tint the reflection.
PBR Texture Sets
When using a texture set from Substance or Quixel, the Specular map is the one that will feed into this channel. Most of the time this will need to be set to non-color data in the Color Space dropdown unless specified otherwise in the app that made the texture set.
Metallic Channel

The Metallic channel makes a material more or less, well, metallic. This channel overrides the Specular channel. It’s best to first decide whether we want the material to be metallic or non-metallic, and then either set the linear slider to 0 (not metallic) or 1 (fully metallic).
Picking Colors
There are three methods Octane uses to set the color and reflection intensity of metal materials. The controls for this are in the IOR channel.
By default, the Universal Material is set to the Artistic type IOR, which means the Albedo channel is used to control the color. In this case, we, once again, want to use a nonlinear method (HSV or one of C4D’s color pickers) of choosing the color to better predict what the result will be.
When using the RGB method of coloring a metal, we need to use physically correct values, which we’ll explore more in the next section.
The Metallic channel also has an Edge Tint property where we can set a color value, and it does exactly what it says - tints the edges of the object relative to the camera. This only works if we’re using the Artistic IOR method in the IOR channel.
PBR Texture Sets
When using a texture set from Substance or Quixel, the Metallic map is the one that will feed into this channel. Most of the time this will need to be set to non-color data in the Color Space dropdown unless specified otherwise in the app that made the texture set.
Emission Channel

The Emission Channel turns a material into a light source. This channel requires one of two Emission nodes hooked up to it to have any effect. These nodes can be hooked up automatically by clicking the “Blackbody emission” or “Texture emission” buttons in the UI, or manually through the node editor.
Even though this is lumped into the “Basic” channels, it’s one of the more complicated ones to get right.
Blackbody Emission is a physically accurate light source. There's some scientific reason it's called that, but we can just think of it like real-world lights we’d find in a hardware store. The color of the light is determined by the temperature. A warm light like a candle (1,900 K) or an incandescent bulb (2,700 K) is on the low end of the spectrum. Octane's default white is 6500 K which is a neutral cast. Above that it starts getting more blue, with stars getting up to 12,000 K (Octane's max). Blackbody is great for simulating real-world fixtures.
Texture Emission: This is far easier to art direct, since we can just say "I want a green or pink light". We can pipe anything into the texture input and produce some cool effects, but generally for just a colored light, the RGB Spectrum node is the way to go.
The tricky part boils down to getting the power settings right, and tone mapping. There’s an entire Lighting and Emission guide, that goes into detail about this, as well as a Color Spaces Overview and Color Management in Octane guide that hits on the importance of tone mapping and what to expect from that.
Interaction with Other Channels
Emission overrides Albedo, Specular and Metallic, but if the light isn’t intense enough, these other channels will start to show through and murk it up. Most of the time we'll want to remove the contribution of these other channels (0,0,0, float 0) and focus on the emission channel to art direct the light and color properties.
PBR Texture Sets
When using a texture set from Substance or Quixel, the Emission map is the one that will feed into a Texture Emission node which feeds into this channel. Other settings in the Texture emission node and Imager will have to be altered to get the look of the original material. Most of the time this will need to be set to non-color data in the Color Space dropdown unless specified otherwise in the app that made the texture set.
Transmission Channel

The Transmission channel controls the translucency/refractive nature (not Opacity - that's a different channel) of the material. The four different Transmission Types produce very different effects.
Specular is mostly for glass, liquids, and glossy minerals like gemstones. The IOR Channel (Dielectric) controls how light bends through this type of material. This mode works well with the Absorption medium to create realistic liquids, or the Scattering/Random Walk medium to create minerals or cloudy liquids.
Diffuse (default in Octane as of 2022) is for semi transparent solids. When combined with a Scattering or Random Walk medium, it’s great for skin, plastics and other non-glossy semi transparent materials.
Thin Wall (Specular) is for something like a soap bubble or very thin plastics or glass (blown glass ornament, etc.). By itself it’s difficult to see this effect, so it needs either some contribution from the Specular channel or a Coating Layer to really stand out.
Thin Wall Diffuse is great for leaves, lampshades, and other very thin objects that still have a strong subsurface scattering effect.
Coloring a Transmissive Material
It can get really confusing and frustrating when building a material if the color is coming from multiple channels that override each other. Restricting the color controls to one place will help us keep our sanity.
Ideally all contribution from the Albedo/Specular/Metallic/Emission channels should be set to zero (0/0/0, float=0), and all of the color properties of a Transmissive material should come from either the Color setting in the Transmission channel itself, or if a medium is being used, from the Medium channel.
PBR Texture Sets
When using a texture set from Substance or Quixel, the Transmission map is the one that will feed into this channel. Most of the time this will need to be set to non-color data in the Color Space dropdown unless specified otherwise in the app that made the texture set.
Advanced Material Property Channels
These channels add to or alter properties of the basic channels.
IOR (Dielectric) Channel

The IOR Channel (IOR stands for Index of Refraction, and is sometimes just called Index) is split into two sections. The top half (Dielectric) affects both the Specular and Transmission channels. The bottom half is for the Metallic channel (see next section).
There are good technical explanations out there, but as an artist, the effect is pretty much that the higher the IOR, the more the light bends and distorts as it travels through a Transmissive (glassy) object, and generally the shinier a glossy material’s reflections look.
Because IOR affects both Specular and Transmission, It’s a good idea to remove the Specular channel’s contribution when we have a transmissive material like glass. This way we can control just how most of the light goes through glass without worrying about how some of it reflects off the surface. If we want a glass material that also has reflective properties, use the Coating channel which has its own IOR controls rather than Specular.
A realistic gas has an IOR of roughly 1, which doesn’t really bend light (think of looking through clear air). Realistic fluids and solids tend to be between 1.3 and 2.5. Check this list or this list out and pick an IOR from there. Most realistic transmissive materials don’t go above 2.5 (diamond). When creating a glossy, opaque material like plastic, Going above and IOR of ~3 starts to get into the realm of metals, and often it’s a better idea to switch to a metallic material at that point.
PBR Texture Sets
When using a texture set from Substance or Quixel, the IOR map is the one that will feed into this channel. Most of the time this will need to be set to non-color data in the Color Space dropdown unless specified otherwise in the app that made the texture set.
IOR Channel (Metallic section)
Metallic IOR is used to affect the properties of the Metallic channel. It has three different modes, all of which use different methods to tint and control how bright the reflections are. These modes are found under the Metallic Reflection Mode dropdown, and reveal different controls underneath them when selected.
Artistic Mode

This is the easiest to use, and also default. None of the IOR input sliders work in this mode, so ignore them. We just color the material in the Albedo channel and we're good to go.
Note that if we’re looking for a realistic color for the metal, the Albedo color will always be a LOT more washed out than we’d expect. Realistic gold, for instance, would be #EFD09A or H:38.1, S:35.6, V:93.7, instead of something like #FFCC00 like we may expect. physicallybased.info has a good set of colors for various metals - change the color representation on the site from 0-1 to 0-255 for RGB values, or HEX for hex values if we’re using the C4D-native color picker.
The Edge Tint color in the Metallic channel will tint the edges in this mode.
Color+IOR mode

This still lets us change the color of the metal with the Albedo channel, but it controls the brightness of the reflections with real-world values. This mode uses a simplified two-value system where we only need an n (first field) and k (second field) value. This mode is good if we want to build a real world metal, but want to tint it a certain color.
If we want, say the reflective properties of Mercury, but with a blue tint, we’d choose IOR+color from the Metallic reflection mode menu, then go to refractiveindex.info and find the page for Mercury. Octane uses 0.54 µm as the wavelength for this mode, so we’d type 0.54 into the wavelength field on that site.
We’ll see that the Refractive index (n) of Mercury is = 1.5017 @0.54µm, so we can put that in the first field of the Metallic IOR section of the IOR channel, and the Extinction coefficient (k) is = 5.3383, so that goes in the second field to get the metallic properties of Mercury. We’d then choose a blue color (#d2eaff in this case) for Albedo.
Edge Tint in the Metallic channel also works in this mode.
RGB IOR mode

This is the most complex method for controlling metals. When set to this mode, the material will ignore the Albedo color and use the IOR’s red, green, and blue n and k values to change the color of the metal in addition to controlling the brightness of the reflection.
Where do we get these six values? Fortunately, physicallybased.info is a fantastic resource that contains values for a ton of different materials. The site lets us choose our engine to get the right values, so we’ll want to set this to Octane. The key thing to remember here is that the first row in the Octane material (just says “metallic IOR”) is actually the RED value. Green and blue are labeled accordingly. The first column is the n values, and the second is the k values. There are also presets for several metals if needed.
If there’s a metal that hasn’t been converted that we need, we’ll have to go to refractiveindex.info, find the metal we want, and then use 0.65µm for the red n&k wavelength values (top field, not labeled “red”), 0.55µm for the green values and 0.45µm for blue.
Universal Material versions of many of the metals on the site using all three IOR types are now available through the Starter Set of materials either located in the LiveDB or downloadable via this guide.
Edge Tint in the Metallic channel does NOT work with this mode.
Caustics
The IOR channel has a checkbox called “Enable Caustics” which we need to turn on if we want our material to contribute to the caustics of a scene using the Photon Tracing kernel. More about that whole thing in the Caustics and Photon Tracing guide.
BSDF/BRDF

This is not a channel itself - the dropdowns, for it are found in the material’s Basic tab (or at the top of the Material properties window in the node view).
BRDF stands for Bidirectional Reflectance Distribution Function, and BSDF stands for Bidirectional Scattering Distribution Function. Both describe how the light reacts when it hits a surface. The effects of Diffuse BRDF are far more apparent with matte materials, while BSDF is more apparent with reflective materials.
The only thing that changed in the illustration above is the BSDF for the brass and BRDF for the orange matte material. Roughness and all other properties are the same.
Roughness Channel
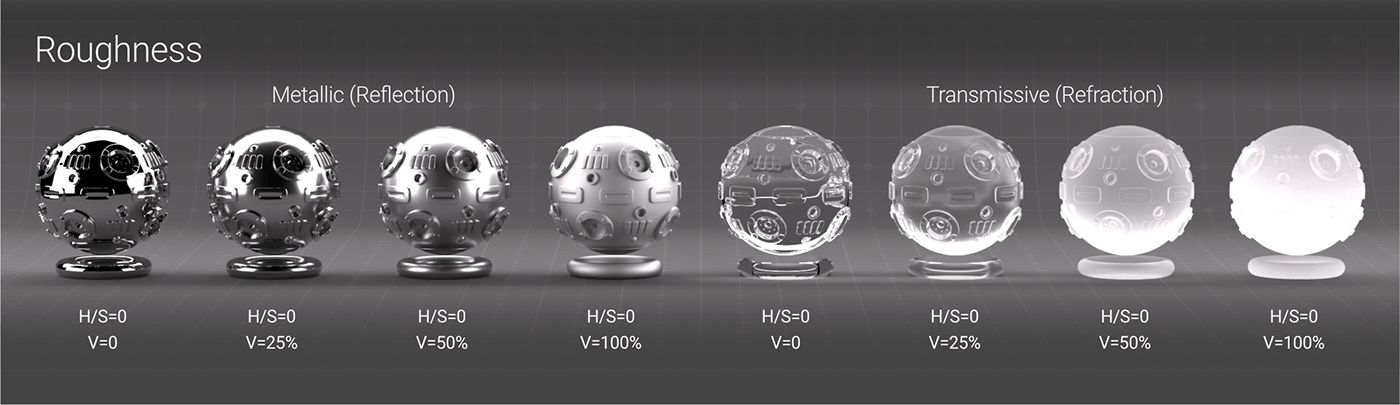
The Roughness channel makes reflection and refraction more or less rough. The results of Roughness varies greatly depending on which BSDF/BRDF model we choose, so that should be determined first before fine-tuning the appearance with the Roughness channel.
We have the ability to choose between a linear (float) and nonlinear (HSV) picker for this channel. If we’re manually choosing a roughness, it’s easier to get HSV sliders going, set the H and S to zero and use the V slider as a 0-100 scale that gives us more evenly distributed values (to our eyes).
PBR Texture Sets
When using a texture set from Substance or Quixel, the Roughness map (or an inverted Glossiness map) is the one that will feed into this channel. Most of the time this will need to be set to non-color data in the Color Space dropdown unless specified otherwise in the app that made the texture set.
Anisotropy Channel

The Anisotropy channel produces a special kind of directional reflective effect. It works really well on metal, but also works on specular type materials (Specular type Transmission and materials with contribution from the Specular channel itself). This channel builds on the Roughness channel.
It’s most commonly seen in the real world in brushed metals, but there are other places it exists, like in hair and concrete.
The setup can get pretty frustrating since there are four steps needed to get this to work. if we miss any, nothing will happen and we'll be flinging sliders around and yelling at the monitor.
1. Most importantly, the material's BSDF type (Basic tab of the material) must be set to GGX, Beckmann, or STD - NOT the default Octane type BSDF. The Octane BSDF model doesn’t support anisotropy, so it will just flat-out not work.
2. The Anisotropy slider in the Anisotropy channel needs to be set to a non-zero value (usually 1). It can also be set to a negative value if we want the effect reversed.
3. Some sort of input is needed in the Roughness channel, either by giving it a value like 0.5 (good place to start), or by using the same texture we’re going to use in the Rotation input (next step).
4. Finally, a texture (image or procedural - it's not picky) needs to be used in the Rotation section of the Anisotropy channel. This controls how light scatters when it hits the surface.
The illustration at the top of this section shows what happens when we connect the same map (shown in on the square) into the channels noted below each shader ball. Piping it into a combination of Roughness, Rotation, and Bump channels all produce different looks with varying levels of detail.
PBR Texture Sets
When using a texture set from Substance or Quixel, the Anisotropy and/or Rotation maps are the ones that will feed into the two inputs. Most of the time these will need to be set to non-color data in the Color Space dropdown unless specified otherwise in the app that made the texture set.
Dispersion Channel

The Dispersion channel disperses the light (splits it into colors) in Transmissive materials. It's most obvious when using Specular type Transmission (see Transmission channel). The effect in Thin Wall and Diffuse is very minimal and usually not worth the render hit.
Dispersion is very GPU-intensive, so be careful when using it.
As of Octane 2023, we finally get access to the Abbe model of dispersion! This is a big deal because it’s FAR easier to find Abbe numbers on the internet than Cauchy ones (the previous model used in Octane) for real-world materials. The Cauchy method is still available for backward compatibility.
The scale goes from 1-100 (0 being OFF, or no dispersion). 1 Gets us the strongest dispersion effect, and then it falls off pretty quickly and becomes very hard to see after maybe 50 or 60 or so. Most real-world glass falls somewhere in the 30-60 range (since for optics, low dispersion is usually more desirable).
The look of Dispersion changes pretty drastically as the Dielectric IOR and geometry of the model change.
Dispersion is just a single value - there are no PBR maps that connect to this.
Medium Channel
The Medium channel produces a volumetric area inside of an object and controls the scattering and absorption of light inside of that area. In order for this to work, the material needs to be Transmissive. Real world scale of the geometry is also very important for getting accurate results with mediums.
This does not control or affect VDB volumes - that’s a whole separate topic with a whole separate guide
The Medium channel needs one of three Medium nodes hooked up to it to work (Absorption, Scattering, or Random Walk). There are three shortcut buttons in the channel’s UI that add these, or they can be added manually in the node editor.
PBR Texture Sets
When using a texture set from Substance or Quixel, there may be one or more maps related to whatever type of SSS the material uses. We’ll likely have to do a little trial and error to see which images map to the specific channels in the Medium node we’re using to get the right result. These maps may either be non-color data or in a specific color space - we’ll need to know which, and set our ImageTexture nodes accordingly.
Absorption Medium
As white light travels through an absorption medium (mostly liquids in the real world), several of the wavelengths (colors) that make it up are absorbed, and the ones that make it through give the object its color.
Absorption is most apparent when used with Specular type Transmission. It will work with Diffuse Transmission, but the density usually will have to be relatively low, and the lighting will have to be just right to see the effects well.

Absorption Color
First, we’ll want to make sure the Transmission color is set to white, and then add a color to the absorption medium. Once we’re comfortable with the effects of absorption, we can play with adding Transmission color in to get some interesting looks.

Absorption Density
This changes how dense the material is, and therefore how quickly light absorbs in it. This setting will depend a lot on the thickness of the geometry. It also depends on the absorption color - darker colors will often need less density than brighter ones when applied to the same object. Absorption colors with the Value (V) set to 100% are very hard to make look dense, even at extremely high density values.
This changes how dense the material is, and therefore how quickly light absorbs in it. This setting will depend a lot on the thickness of the geometry. It also depends on the absorption color - darker colors will often need less density than brighter ones when applied to the same object. Absorption colors with the Value (V) set to 100% are very hard to make look dense, even at extremely high density values.
Inverting Absorption
Technically, the proper absorption color for the cooking oil above would be the complementary color of orangey-yellow, which is a purply-blue. Because nobody wants to sit there with a color wheel, there’s an option in this medium to invert absorption color (on by default). This is usually the preferred way for artists to work with it - if we want the material to look yellow, we just pick a yellow with this option checked. We’ll need to uncheck this if we have a physically-accurate absorption color for our material.
Technically, the proper absorption color for the cooking oil above would be the complementary color of orangey-yellow, which is a purply-blue. Because nobody wants to sit there with a color wheel, there’s an option in this medium to invert absorption color (on by default). This is usually the preferred way for artists to work with it - if we want the material to look yellow, we just pick a yellow with this option checked. We’ll need to uncheck this if we have a physically-accurate absorption color for our material.

Absorption in large bodies
In larger bodies of fluids like bathtubs and oceans, we can really start to see the difference between water with a tinted Transmission color vs one with Absorption. We can also see the effect different absorption colors have on objects with different Albedo colors when they’re embedded in an object with an Absorption medium.
Scattering Medium
With this medium applied, as light passes through an object, the rays scatter and bounce around, and it creates a cloudy/milky, semi-transparent effect. This is also known as Subsurface Scattering. This effect is really finicky and time consuming to get right. It’s also very GPU-intensive which makes iteration times slower.
The color and look of a material with scattering is a delicate balancing act between the Scattering color in the Medium, the Absorption Color in the Scattering Medium, the density, the lighting, the Transmission type (specular or diffuse), the Transmission Color, and the size/shape of the object the material is being applied to. This is assuming Albedo/Specular/Metallic is all set to have no contribution.

Transmission Type & Density
Scattering works with both Diffuse and Specular type Transmission, but with far different results.
Diffuse transmission with scattering is well suited for plastics and other semi transparent solids. It’s usually better with higher Density settings in the Scattering node.

Scattering Color
The color assigned to the Scattering input determines which wavelengths (color components) of light will scatter, and which will pass straight through. If it’s set to white, all of the wavelengths will bounce equally and the object will just look darker on the side opposite of where the light source is shining.
The color assigned to the Scattering input determines which wavelengths (color components) of light will scatter, and which will pass straight through. If it’s set to white, all of the wavelengths will bounce equally and the object will just look darker on the side opposite of where the light source is shining.
If it’s set to a color, that color’s wavelengths will bounce around and be visible where the light is shining, but once it makes it through the other side (depending on density), all that will be left is the complementary (opposite) color of the one we chose.

Scattering + Absorption
There is also an Absorption input in the Scattering node. This works the same as the Absorption Medium, and can work in conjunction with the Scattering color to determine which colors are let through on the other side.
There is also an Absorption input in the Scattering node. This works the same as the Absorption Medium, and can work in conjunction with the Scattering color to determine which colors are let through on the other side.
In the example above, just putting a blue color in Scattering produces a murky orangey red color on the other side after all the blue bounces around and dissipates.
When the same color is also put into the Absorption input, all of the orangey red is absorbed up front, so the blue is still visible through the object. When a slightly darker version of the blue is put in Absorption, it absorbs more light as it goes through and the overall effect is darker.
When white is used in Absorption, the blue color is absorbed up front, and as the light goes deeper and splits and bounces more, and the complementary orangey-red color is all that’s left.
Emission
There’s also an Emission input which adds light emitting properties to the scattering.
There’s also an Emission input which adds light emitting properties to the scattering.
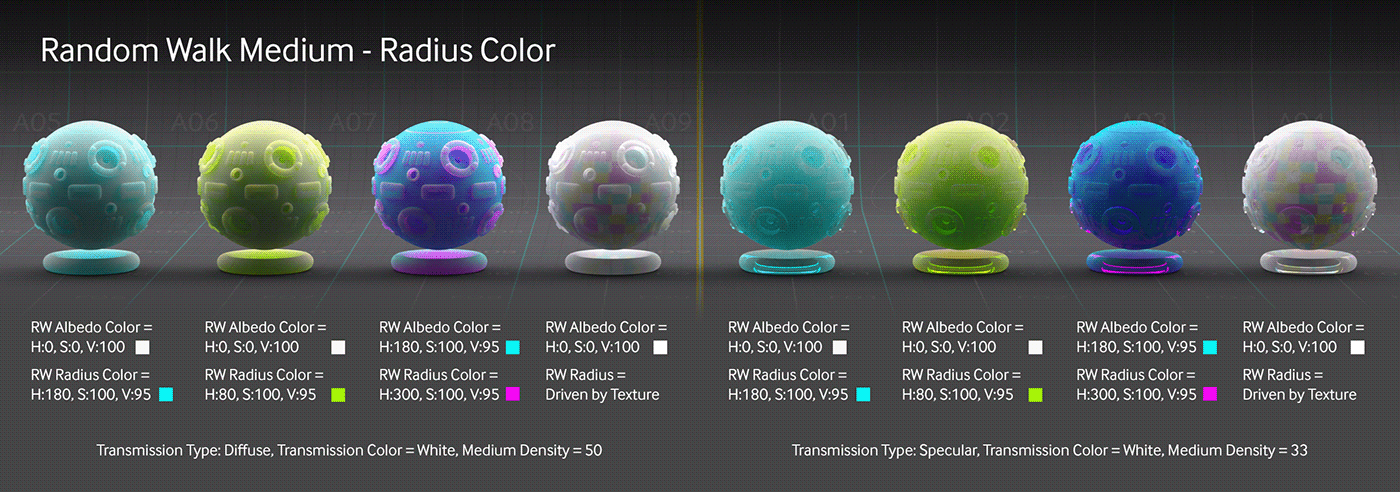
Random Walk Medium

Random Walk is a newer medium that also scatters light, but uses a different algorithm than the Scattering Medium and has different controls.
The difference ranges from subtle to more pronounced depending on the geometry, colors and lighting. Above, we can see that Random Walk when used with Diffuse Transmission produces a softer blend between the more and less dense areas. When used with Specular Transmission, in this case Random Walk preserved the surface details better when used with similar settings.
Random Walk is especially good for skin and other organic semi-transparent materials.

Random Walk Albedo Color
This is completely different from the Universal Material’s dedicated Albedo channel, so in the illustrations we refer to it as RW Albedo.
Any color we place in the Random Walk Medium’s Albedo channel will determine the color of the scattering effect, but unlike the Scattering Medium, it will not produce the complementary color on the other side of the light source, so there’s no need to counter it with Absorption (in fact, there is no Absorption in the Random Walk node).
Density
This works the same as the Scattering Medium (see above). This controls the overall density of the medium which lets more or less light through which in turn makes the object appear lighter or darker and changes the appearance of the material.
This works the same as the Scattering Medium (see above). This controls the overall density of the medium which lets more or less light through which in turn makes the object appear lighter or darker and changes the appearance of the material.

Radius
Radius works hand in hand with Density to control how solid the material feels. Density is a flat 0-100% scale, but Radius can be controlled across the surface of the geometry by adding a texture map in.
Radius works hand in hand with Density to control how solid the material feels. Density is a flat 0-100% scale, but Radius can be controlled across the surface of the geometry by adding a texture map in.
The slider currently (as of 2023.1.2) goes from 0-1635 or so, but only values between 0-1 are recognized, so if we’re inputting a number manually, we should think of it as a 0-1 float slider.
Radius Texture Input
The Radius setting also has an input that we can put a texture into. Putting a solid color (RGB Spectrum) into this field works similarly to Absorption in the Scattering medium. When all of the main color is scattered away after light enters the object, what’s left is the radius color we specify.
The Radius setting also has an input that we can put a texture into. Putting a solid color (RGB Spectrum) into this field works similarly to Absorption in the Scattering medium. When all of the main color is scattered away after light enters the object, what’s left is the radius color we specify.
Once a color is fed in, the radius value in cm is no longer able to be set, so Density will be the main control for the... well... density of the effect.
Image textures and gradients can be fed in here for interesting effects as well.
Surface Depth Channels
These channels add extra detail to the surface of the object.
Bump, Normal, & Displacement Channels

Both Bump and Displacement use the same map (usually called a Height map). Normal uses a GL Normal map (not a DX one), which is easily recognizable by its blue/purple/green appearance.
Bump and Normal create a "fake" bumpiness effect which does not affect the silhouette of the geometry, and is very easy on the GPU. A full rundown on Normal maps and how they compare to Bump can be found here. These two channels are best for small details on a surface that don’t need to physically alter the polygons to sell the height effect.
Displacement actually pushes the geometry in or out which does affect the silhouette, but is much more GPU intensive than either Bump or Normal. This is used for adding a lot of extra detail to a model where the lighting or camera angle will change significantly enough that Bump or Normal maps would produce visual errors.
Displacement is tricky and is dependent on a lot of things to work properly. Two entire guides have been written just go over this (part I here, part II here), and there was even a need for a dedicated guide on troubleshooting displacement.
PBR Texture Sets
When using a texture set from Substance or Quixel, the Height map is used for bump and certain kinds of displacement. There’s also Vector displacement which stores more data using the color channels. This will only work in the Displacement channel, specifically with Vertex Displacement (not Texture Displacement). This map may be called Displacement or Vector Displacement.
The Normal channel in Octane expects a GL type Normal Map. The DX type is similar, but the green channel is inverted which causes incorrect results.
Height, Normal, and Displacement maps will need to be set to non-color data in the Color Space dropdown unless specified otherwise in the app that made the texture set.
Special Effect Channels
These channels work independently of the other channels to produce specific effects.
Opacity Channel

The Opacity Channel works similarly to the Opacity slider in Photoshop. This is very different from Transmission and isn’t used to create glass or translucent materials.
The 0-1 float slider adjusts the opacity of the entire object. This is good for a hologram or a fade transition. Unlike Photoshop, we start seeing the back side of the object through the front side as we reduce the opacity, so there are some interesting effects that can happen here.
If we run a texture into the opacity channel, we can punch holes in materials meant for thin objects like paper, fabric, or a decal. This isn’t great for 3D geometry as seen above, unless the goal is to make sliced ribbons or something like that.
When a texture is used in the Opacity channel, black pixels in the texture become 100% transparent in the material, and white pixels become 100% opaque. Grays fall between, making semi transparent portions of the object.
PBR Texture Sets
When using a texture set from Substance or Quixel, the Opacity or Transparency map is used in the Opacity channel. Depending on what “opacity” or “transparency” means to the app developer, this map may have to be inverted to read correctly.
Most of the time this will need to be set to non-color data in the ImageTexture’s Color Space dropdown unless specified otherwise in the app that made the texture set.
Thin Film Channel
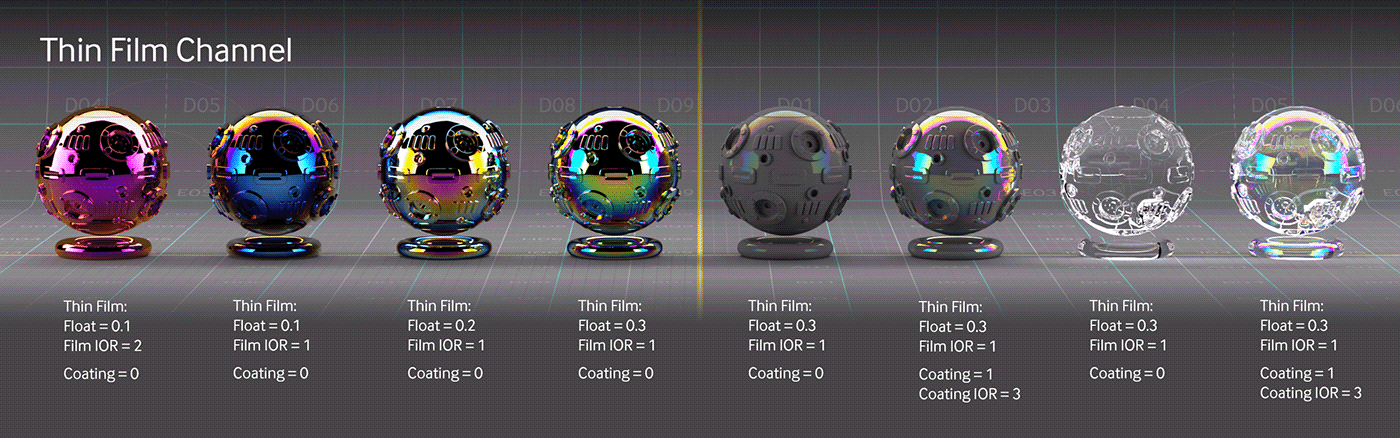
The Thin Film Layer channel puts an iridescent oily sheen on the object. The more reflective (higher IOR) the material, the more obvious the effect. Because of this, it works exceptionally well with metallic materials.
For non-metallic materials, combining Thin Film with the Coating channel really helps it pop out, as seen above on the right.
In the case of a glossy opaque material, the Specular channel with a low IOR (1.3) gives a weak Thin Film effect. While the IOR could be punched up to 2 or 3 to enhance the effect, it would also change the other specular properties of the reflections. Adding a Coating layer with an IOR between 2 and 3 makes it really punchy and allows us to control the effect separately from the specular channel.
Thin Film doesn’t affect Transmission. If we want this effect on glass, we either need to add Specular channel contribution or a Coating layer. The IOR channel controls both the Specular and Transmission, so most times we’ll need too high of IOR to make the thin film effect apparent, and that will make glass’ refraction look like diamond. Again, the Coating layer would be a better option here because it has a separate IOR control so we can enhance the thin film effect without changing the refraction properties of the glass.
The coloring of this effect is a little hard to art direct, but what it essentially comes down to is playing with both the channel's Film IOR and Float sliders (leave the color input at 0,0,0).
Film IOR controls how spread out the colors are, with 1 having a tight radial pattern toward the edges of the geometry and higher than that showing fewer of the colors in the spectrum.
Float cycles through the colors. The higher both of these numbers, the less pronounced the overall effect is.
Typically the rounder the object, or more the points on the surface vary in the geometry, the more colorful this effect will be.
PBR Texture Sets
When using a texture set from Substance or Quixel, the Film Width map is used in the texture slot. This may or may not display correctly and the Film IOR will have to be tweaked to get the effect looking right. This map will likely be need to set to non-color data unless otherwise specified.
Round Edges Channel

This channel rounds sharp edges of the geometry at render time.
It’s similar to a bump or normal map where it doesn’t alter the silhouette of the object though, so it’s best for geometry that just has some sharp internal corners, or small bevels that catch specular highlights.
This channel is hidden by default, and needs to be enabled by going to the Basic tab of the material and checking the box next to the channel name.
Fast mode is good for adding just a touch of bevel to sharp edges to bring out highlights - this mode is capped at about 1cm.
Accurate mode has some more advanced controls like roundness, and works with larger values. When Roundness is brought to zero, the edges look chiseled.
Round Edges does not have a texture input, so there’s no associated PBR map.
Top Layer Channels
Coating, Sheen and Material Layer all go on top of everything else, and can be used with any combination of the channels covered already.
Coating Channel

The Coating channel puts a glossy specular layer over the top of the material. This is extremely useful, because it can be used to give a material some extra gloss or enhance a thin film effect without affecting the other properties of the material. It’s also great for a clearcoat on top of automotive paint.
Coating has a few options - Amount (float), Roughness, and IOR.
Amount is just a 0-1 scale that changes the intensity of the effect. 0 is no effect (or off), 1 is full.
Roughness controls the roughness of the coating layer (different than the Roughness channel).
IOR controls the look of the reflections for the coating. 8 is super shiny like chrome. 1.5 is similar to glass. This is separate from the dedicated IOR channel. The controls here do not affect how light passes through a transmissive material in the Transmissive channel, or the material’s Specular channel.
Coating also has its own Bump and Normal channels that work the same way they do in the regular material channels by the same name.
PBR Texture Sets
When using a texture set from Substance or Quixel, there are a few maps that might come with the set to feed into the various Coating inputs. Coating or Clear Coat, Coating Roughness, Coating Bump, and Coating Normal are all possibilities and feed into the appropriate inputs. These maps will likely be need to set to non-color data unless otherwise specified.
Sheen Channel

The Sheen channel produces a satin-type finish over the top of the material. It works best with a matte type material like cloth or paper. Sheen can be added to metallic or specular type materials as well, but often it’ll be overpowered by specular reflections in those types of materials.
The sheen Roughness slider affects how spread out the effect is. 0 will produce a sharp rim light effect, while 1 will create almost a rough metal look. Usually starting around 0.25-0.4 works best. A bump or normal map can also be added to the sheen to break it up.
PBR Texture Sets
When using a texture set from Substance or Quixel, there are a few maps that might come with the set to feed into the various Sheen inputs. Sheen, Sheen Roughness, Sheen Bump, and Sheen Normal are all possibilities and feed into the appropriate inputs. These maps will likely be need to set to non-color data unless otherwise specified.
Material Layer
The Universal Material supports Material Layers, which allow for composite materials (glass mixed with metal, or glossy mixed with emissive) without needing to use Octane’s Mix, Composite, or Layered type material. This is way too complex of a topic to go into here, and it requires knowledge of mixing and masking. More on this can be found in this guide.
Author Notes
Version 3.0, Updated Jan 2024 using Octane 2023.1.2 and C4D 2024.2
This guide originally appeared on https://be.net/scottbenson and https://help.otoy.com/hc/en-us/articles/212549326-OctaneRender-for-CINEMA-4D-Cheatsheet
All rights reserved.
The written guide may be distributed freely and can be used for personal or professional training, but not modified or sold. The assets distributed with in this guide are either generated specifically for this guide and released as cc0, or sourced from cc0 sites, so they may be used for any reason, personal or commercial.


